Saturday, May 29, 2010

Happy Memorial Day Weekend!


And welcome to the next stop on the Operation Write Home Memorial Day Blog Hop! I'm so glad you made it this far--aren't all the entries fantastic?! If you've happened here and didn't know about the Hop, please go back to the start and begin there! Operation Write Home Memorial Day Blog Hop


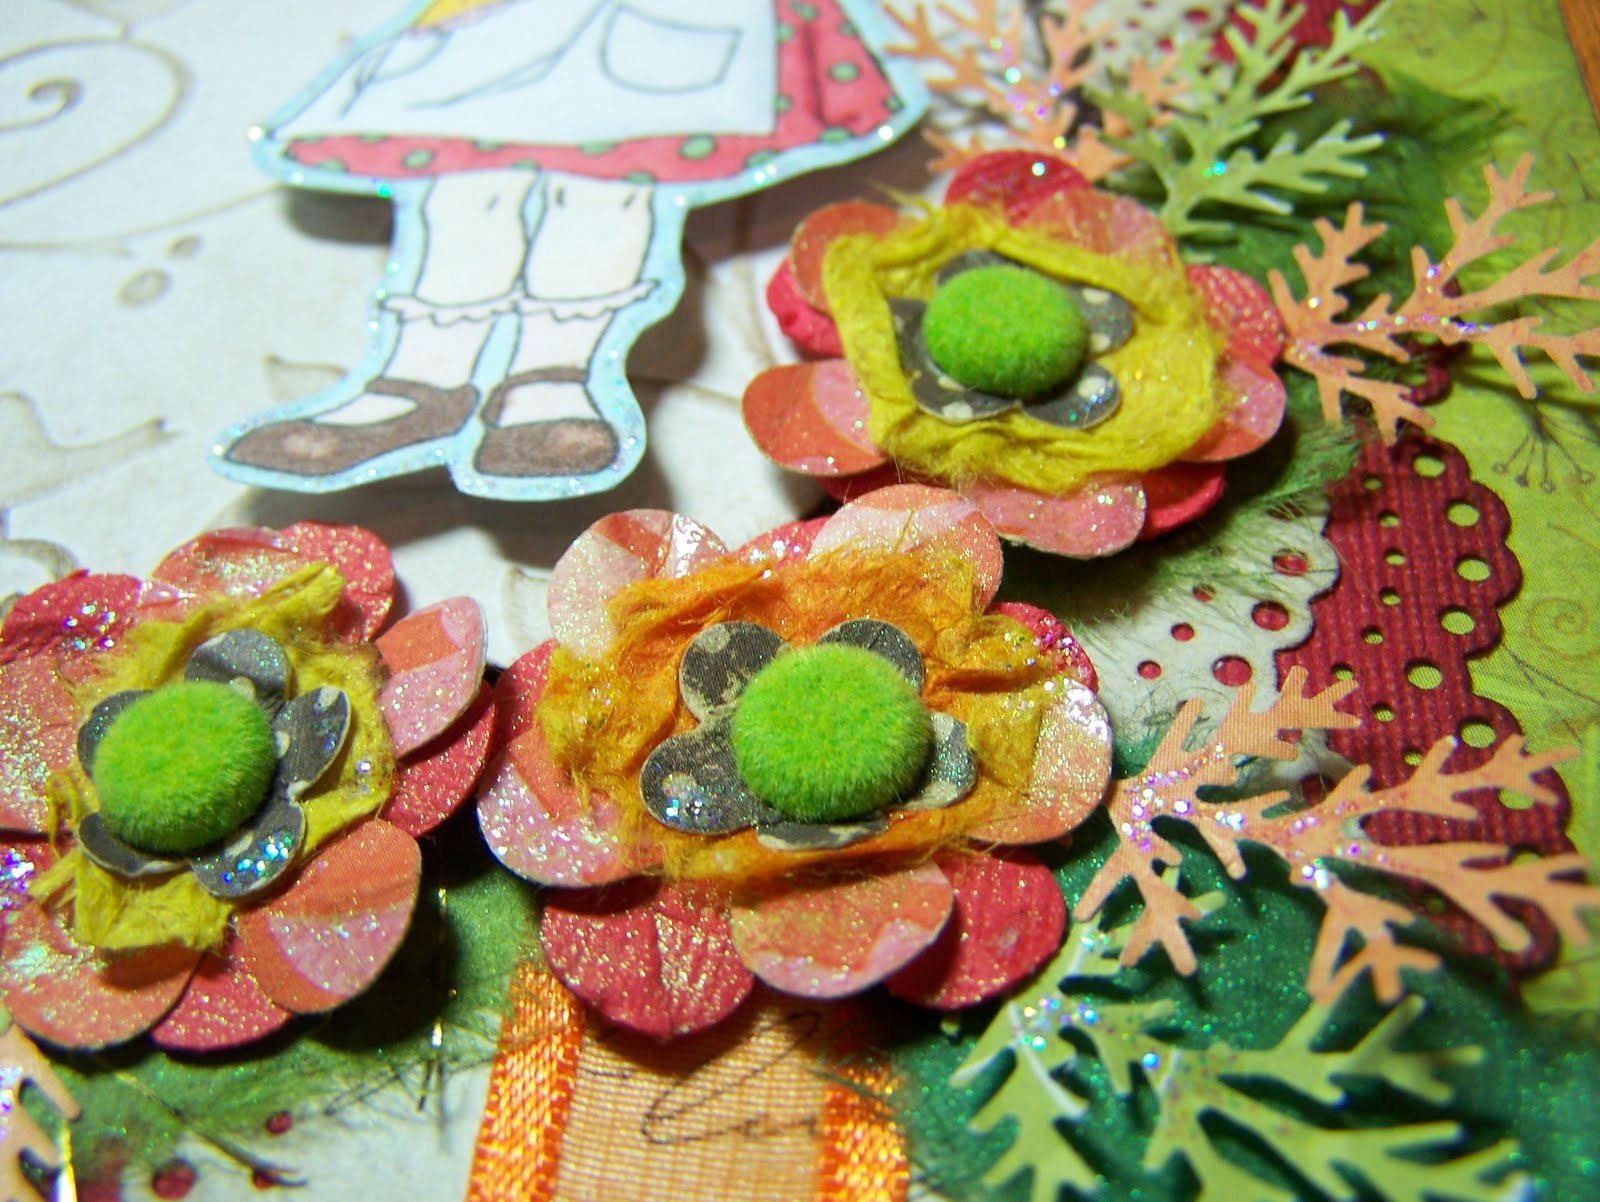
Here is my card; it is a coupon holder, actually. I made a space to write a short note on the back of the card. I used some of the exclusive stamp sets from Simon Says Stamp, one of our sponsors for the Blog Hop. I enjoy making cards for OWH; and especially ones for children. I know it has to be difficult for families when one of them has to be away. And hopefully a card from Mommy or Daddy will brighten a little one's day! My family truly appreciates everything that our armed forces personnel do to protect our freedom, and I teach my children about the sacrifices they make every day on our behalf. 


I also have a tutorial for you on making handmade flowers. Please feel free to look and bookmark it to try later! Visit my handmade flower tutorial here!


Need help getting started making cards for OWH? Did you know they have a whole bunch of super cute digis that companies have donated? How cool is that? There's something for everybody there! Here's the page:

And here are the guidelines and how to get started. So, go get started! (Oh, finish the blog hop first!) :-)
http://www.owhstarsandstamps.org/p/about-owh.html

Card Recipe:
Idea for the money/coupon holder: by
Jacqui at Whiff of Joy Inspiration Blog
Stamps: Simon Says Stamp Exclusives Deer with Forest Family, Card Sentiments, Owls and Branches


Now, on to the next blog,

Thanks for looking, and happy Memorial Day! Lisa :-)


Friday, May 28, 2010

My Card for Sketch Saturday!


Good morning! I made this card for the "Bluebonnet Project" for my mom by the great sketch on Sketch Saturday this week! Thanks for the inspiration, ladies! Have a great weekend, and don't forget to stop by the Operation Write Home Memorial Day Blog Hop! You can start here at 10am EST tomorrow! Lisa :-)

Thursday, May 27, 2010

A Quick Post to Enter Just Magnolia!


Hello! I would like to enter this card in this week's Just Magnolia Challenge--barely on time! I just got this stamp and wanted to try her out. My daughter colored her for me, and it looks so sweet! Happy stampin'! Lisa :-)

Sunday, May 23, 2010

My Card for Delightful Inspiration!


Hello and I hope you're having a great Sunday! I made this card for the Delightful Inspiration blog with the free digi image that I got for participating. Faith keeps coming up with such cute images! The last several weeks, I've been using them to make cards for Operation Write Home. So I'll be sending this one along also! Have you heard of the Operation Write Home Memorial Day Blog Hop? I'll be on the hop, and I hope you will be too! Hop on over there to find out how! This was so fun last year, we can't wait to do it again. Check back this weekend; there will be a sponsorship from none other than Simon Says Stamp! :-)


Faith at Delightful Inspirations offers a free digi stamp to make cards for OWH. I've made a few with this stamp and it is really nice! Go to her post about it here

I hope everyone has a great weekend! Thanks for looking and happy stampin'! 

Saturday, May 22, 2010

My Card for Four Challenges and My First Tutorial!


Good evening! I made this card by the Friday Sketchers sketch for this week. I really like this sketch! I also followed a new challenge I found called Fussy and Fancy Friday Challenge. There was almost not enough room on the card for all of the papers, embellishments and images that the Fussy and Fancy Challenge called for! But it was really fun to put together, thanks for the inspiration! The Whiff of Joy Challenge this week is yellow and brown and one other color, and so I chose blue green as the additional color. I guess I added off white, too, so I may not even qualify! :-) And then the Create 4 Fun Challenge is to make a vintage card--I guess a Genie is pretty vintage, right?! :-) Anyway, I had a lot of fun creating this card, and I even made a little tutorial about how I made the paper flowers. Hope you'll hop by there and take a look!


Thanks for looking and happy stampin! Lisa :-)

Making Paper Flowers--A Tutorial


Hello Everyone! I've been working on learning to make paper flowers for some weeks now.  There are many ways to make paper flowers, and lots of great tutorials out there, and I've read and watched a ton of them. I've happened on a method of making paper flowers that I like, and I thought I'd share it with you in this tutorial. Ready? Here we go!


First of all, here are the supplies I used to make my paper flowers (BTW, I'll let you know what I used and where I got them at the end. . .):


Punches of varying sizes/shapes
Paper scraps
Mulberry paper scraps
Small sharp scissors
Waterproof Mat
Brads
Glimmer Mist
Distress Ink
Gold Ink
Sponges
Paper Piercer
Glue Dots

Heat Gun

Optional Things
Embossing Machine
Embossing Folder
Stamps--like flourishes


Step One: Punch your flowers.
 I like to make two the largest size and offset them.
(You'll see what I mean in a bit.)

Then any decorative middle flowers--I used an aster punch and some mulberry paper.
Then some kind of center.


Punch all those in multiples of the number of flowers you would like to make. I made three, so I punched the following:
3 solid large flowers
3 patterned large flowers
3 aster flowers
(mulberry paper in the next step)
3 small center flowers


Step Two: Make the mulberry paper layer.


Rough cut a circle just a bit (maybe 1/8 to 1/4 inch) larger than you'd like the finished circle. I made mine about the size of a quarter.


Then, using a damp sponge, wet the mulberry paper and tear away the edges of it by grasping small "bites" between your thumb and forefinger and pulling. 


Here are what my mulberry layers look like. (These already have the Glimmer Mist on them--I forgot to take a photo of this step!)

You can do the same thing for your leaves now if you'd like. Just rough cut a leaf shape and pull bites out of it also. I made my leaves about 2 1/2 inches long.


Here are what my finished leaves look like.


Step 3: Distress and decorate.
There are lots of options here! You could run them through your embossing machine with your favorite embossing folder, you could ball them up spit-wad fashion and unfold them. You could ink them with distress ink or another kind of ink. You could stamp over them with flourish stamps. I think they look better with some kind of distressing--more natural, I guess! Here's what I did to mine:

The first thing I did was run them through my embossing machine with an embossing folder.


Then, I squashed them into balls and then unfolded them.


Then, I sponged them with distress ink and gold ink.


Finally, I sprayed the flowers and the mulberry paper layers with Glimmer Mist. I probably did too much distressing and decorating. . . :-)


Dry your layers using a hot air gun.I put them in the lid of a cookie tin so they won't blow away!


Step Four: Put the layers together.


When all of your layers are dry, you can make your flowers.


Layer the flowers as you'd like. I like to offset the plain and pattern flowers so that the petals show behind.


Using a paper piercer, pierce a hole in the center of the stacked flowers. 


Place a brad in the hole and spread the brad on the back. I like to press the flower down on the table to flatten out the back of the brad a bit more.


Step Five: Place your flowers and leaves.


I punched some fern leaves, too. I really like the look of these.


Using glue dots, arrange and place your flowers on your card or scrapbook page.
And you are done!


Here is my finished card.


And a close-up of the flowers. 


I think my brads are too big, but. . .they are already stuck on the card. So, I'll use smaller ones next time, no worries! :-)


Here is another example of a card with flowers I made using this method.


A close up of the flowers. I love the fuzzy brads!


Supplies and Where To Get Them
Stamps: Whiff of Joy April Stamp Kit - Scheherazade (1001 Nights)
Punches:
Ek Success PSM130C Paper Shapers Retro Flower Medium Punch

Paper Shapers Paper Punch: Flower
Stacking Punch -- Daisy
Martha Stewart Fern Punch

Cuttlebug Machine, Die-Cutting and Embossing,
Cuttlebug Embossing Folder, D'vine Swirls


Distress Ink--Walnut Stain
Gold Pigment Ink
Glimmer Mist--I used Wheatgrass

Making Memories Paper Piercer Deluxe
Pearl Brads
Glue Dots


Thank you for viewing my tutorial! It's my first, so please leave a comment and let me know how you liked it! I'd appreciate any input you have to make it better. Have fun and happy stampin'!

Thursday, May 20, 2010

My Card for a Few Challenges


Hello everyone! I have made a card for a few challenges, and I've even challenged myself to use my Cricut machine. I had to have that thing, and most of the time it just sits there. :-( So, I used the Storybook cartridge to make the butterfly and the twirly thing. It took a little time to figure out the right size, but here's what I did. The twirly thing is set at 1.5 inches on the Shift-V with the Tall button on. Then, the pink butterfly is just Shift-V at 1.5 inches. I like it, and I might try some more. I'll let you know what sizes I find that work for 6 inch cards. 


I've been really working on trying to make my own flowers. (Of course, I just placed an order for some from Wild Orchid Crafts, at DD Greta's request, so I probably will be set for awhile without making my own.) I used some mulberry paper this time between the layers. I love the fuzzy brads. I thought they would look lame, but actually fit the card nicely! The stamp is from Whiff of Joy, which I just received from my order with my 25% off coupon for Mother's Day (yeah!) Perfect timing, because this card is for my husband's grandmother who has had some surgery recently. 

I'd like to enter this card in the following challenges:
Pollycraft Monday--Summer Blooms--I've got some gorgeous red and yellow/orange day lilies blooming in my yard now!
Papertake Weekly--Say it With Flowers
Create 4 Fun--great sketch!


Off to bed, got a big day tomorrow! Girl Scout campout, fun! First one of the year! I hope everyone has a nice weekend! Lisa :-)


Monday, May 17, 2010

My Cards for Delightful Inspirations


Good morning! My daughter Greta and I made these cards for Operation Write Home yesterday! We used this week's image from Delightful Inspirations. Wouldn't these be sweet cards for a service person to send home to his or her family? We left them blank inside so they could be I love you cards, birthday cards or just because cards. The image would work for all of those and more! So sweet!


Have you heard about OWH's Memorial Day Blog Hop? Well, I participated last year and it was super fun! So, I've signed up again this year--and you can too! Here's how!


I hope you have a great Monday! Lisa :-)